
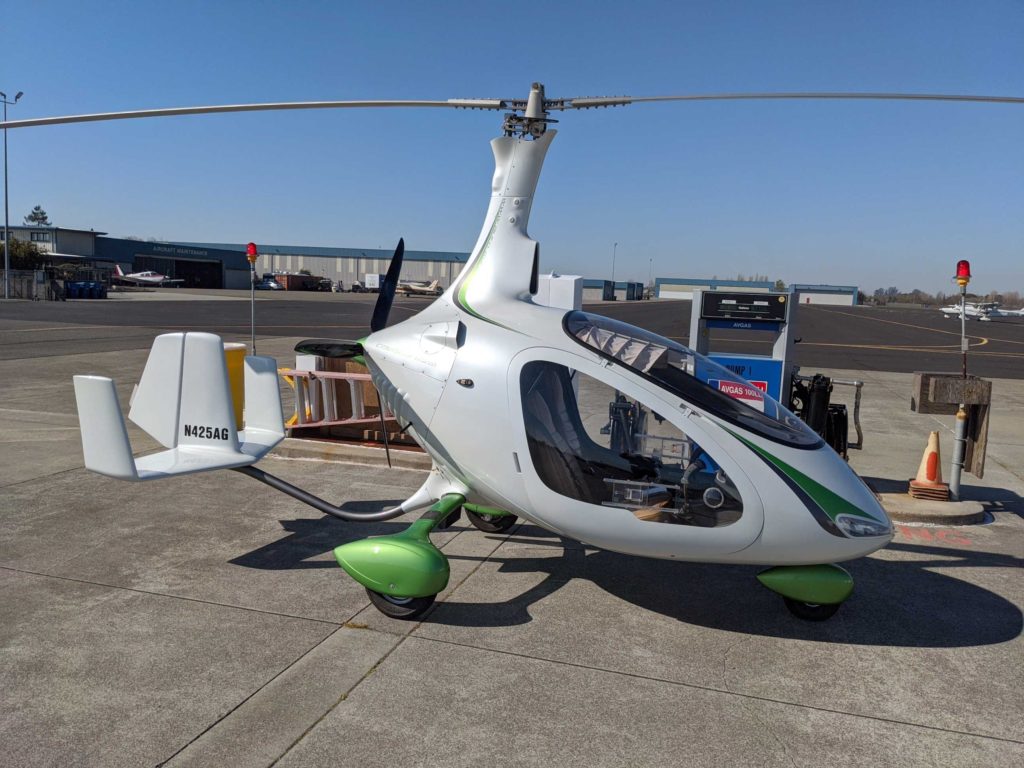
Most people–heck, even most pilots–don’t know what a gyroplane or autogyro is. To the untrained eye, it looks like a helicopter. But it is neither a helicopter nor is it a traditional airplane. Rather it is an aircraft type that uses a spinning rotor as its wing, much like a helicopter. But like an airplane, it uses a fairly conventional propeller to drive it forward through the air. The big difference between an autogyro and a helicopter is that the lift-providing rotor is not driven by the aircraft’s engine. Rather it rotates on its own, following the effect known as “autorotation.” As a result, there is no tail rotor and this is perhaps the fastest way to tell an autogyro from a helicopter. Most modern gyroplanes use a “pusher” propeller mounted behind the pilot and immediately in front of the tail assembly. This too, is an indicator that the craft in question is a gyro and not a helicopter.
The big difference between the autogyro and a traditional airplane is that the autogyro doesn’t stall. That rotor-for-a-wing that spins on top continues to create lift even as forward airspeed drops to zero. And while a gyro cannot hover like a helicopter it can fly slower than most airplanes.
I remember hearing about autogyros when I was flying gliders back in the aughts. I would run across them in FAA guidelines, yet no one I asked seem to have a good explanation of what they were. I forgot about them until 2018, when I attended the Experimental Aircraft Association’s Oshkosh airshow. In February 2020, I got a chance to learn how to fly a gyroplane. Under the direct supervision of a Certified Flight Instructor, I flew the aircraft pictured above on 12 separate days, accumulating 23 hours of flight time. (This still qualifies me as a complete noobie, by the way.) This post includes a six-minute video showing one takeoff and landing at the end of day 11 of training. I am annotating it with a detailed description of the key things that I did to takeoff, land and fly this gyroplane. I offer this to inform those who might be interested in learning what is involved in flying a gyroplane and broadly how it differs from flying other types of aircraft. This is not an instructional video. You cannot learn to fly a gyroplane by watching this video or reading this webpage. No one should attempt to fly any aircraft without proper and detailed hands-on instruction and appropriate certification.
OK, here’s what this post includes:
- Control panel diagram with labels and explanations
- A point by point description of my actions through the video. (This description is more detailed and includes sections omitted from the one given on the Youtube page.)
- The actual video, embedded from YouTube.
#gyroplane #gyrocopter #Autogyro #AutogryroUSA
Instruments and Controls
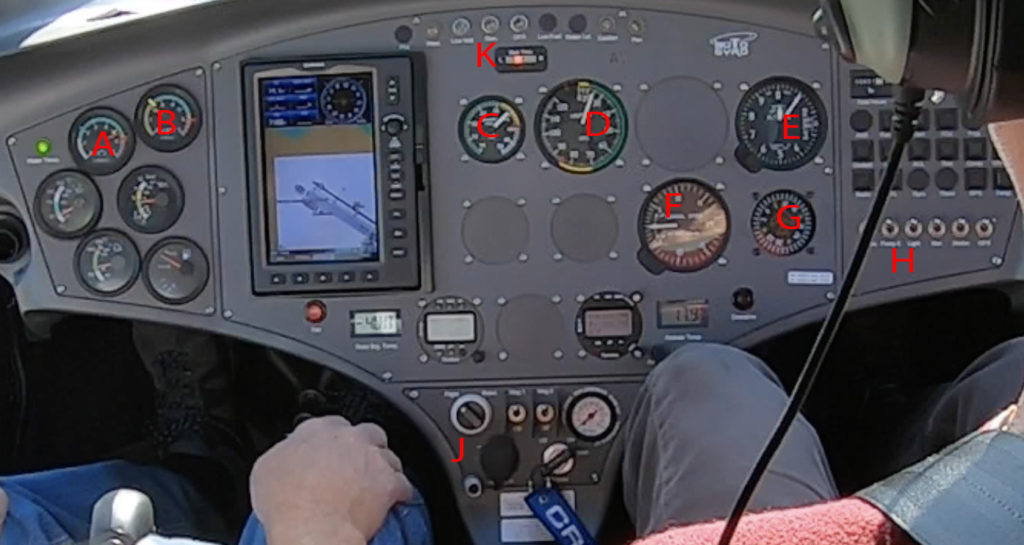
Example of an Autogyro USA Cavalon Instrument Panel (Due to owner preferences, not all are the same.)
A – Engine RPMs – green zone is 1,400 to 5,500 rpm. Mostly used during taxi, engine warm and rotor pre-rotation on the ground.
B – Rotor RPMs – yellow zone up to 220 RRPM, green above that to 550 RRPM. Generally in 300-400 range.
C – Engine Manifold Pressure – primary indication of engine power during takeoff and flight.
D – Airspeed indicator – First labeled number is 20 knots. Green arc from 16 to 70 kts. Red zone at 86 kts. (See endnote on safe airspeeds.)
E – Altimeter (showing elevation above sea level, 90 ft while on the ground at Petaluma airport)
F – Variometer – sink/climb in feet per minute. Level flight at 9 o’clock. 1st major hash @5(00) fpm up & down. Not very accurate <~200 fpm.
G – Compass showing heading
H – Electrical switches – second from left is “Pump 2” which generally only runs during takeoff and landing. “Light” is 3rd from left.
J – Rotor Brake – Shown in “Flight” or “free” position in this picture. Switched to “Brake” position to slow and stop the rotor after landing.
Right of the rotor brake are the two engine magneto switches then a pressure gauge for the rotor brake which has to be pumped up each time it is applied. Pump is actuated by the conical thumb switch (also used to adjust trim) on the top rear of the stick.
K – Warning and indicator lights. (Top of panel.) The “Low voltage” light comes on at minimum idle speed on the ground.
The gauges below A and B are oil temperature and pressure, water temperature and then fuel gauge.
I do not yet have any experience with the installed avionix/navigation panel.
Flight Controls
Each pilot has a stick which controls the attitude (pitch/angle/tilt) of the rotor on the top of the aircraft. The stick includes three buttons: a “push-to-talk” radio button on the front and activated by the index finger; a “rotor pre-rotator” button at the far front end of the thumb rest and activated by the thumb; and finally, a cone-shaped button on the top back portion which is also activated by the thumb. This cone-shaped button is used in flight to adjust trim and on the ground when the rotor brake is in “brake mode” to pump up the rotor brake.
In the center console between the two seats are the “gas and brakes”—more appropriately known as the engine throttle and the wheel brake.
The aircraft also has traditional pedals tied to the nose wheel and the rudder on the back half of the vertical stabilizer. Rudder controls are typically very lightly used in flight as the aircraft doesn’t seem to need much balancing in turns. The time they are most needed actually tends to be when adding or reducing power to counteract the engine-induced yaw.
Video Explanation:
This video shows two people in an Autogyro USA Cavalon gyroplane. The primary pilot (in this case a student pilot) sits on the right side and the secondary pilot (a gyroplane CFI) on the left. This is a takeoff to the pattern, returning to the same runway, which is 11 at Petaluma.
Flight Sequence
As the video begins, we are pulling on to the runway. The rotor brake has just been turned off, so the rotor is not turning.
At 0:05 I use the wheel brake to bring us to a stop and then adjust the throttle to 2000 rpm—just a bit above the normal idle speed—to begin the pre-takeoff process. At 0:09/0:10 I shift my thumb forward on the stick to activate the pre-rotator button. Throughout the pre-rotation sequence, my left hand is holding the wheel brake and also adjusting the throttle.
It takes fully five seconds after the pre-rotator is applied before the rotor starts to turn—you’ll see the rotor shadow pass by for the first time at about 0:15. The pre-rotator puts quite a load on the engine and through this part of pre-rotation, I am closely watching the engine RPM gauge to ensure that rpms don’t drop below 1600 rpm. At 0:20, you’ll see me briefly lift my thumb from the pre-rotator button. This relieves the downward trend of engine rpms. Once the rotor starts spinning, engine rpms quickly return to pre-engagement level of 2000 rpm. Now I add throttle starting at about 0:28 and you’ll see from the rotor shadow that it spins faster and faster. I’m still looking left, but now at the rotor RPM gauge. When it reaches 200 rotor rpms, it is time to disengage the pre-rotator and initiate the takeoff roll.
At 0:35, four important things happen in a specific sequence: 1) release pre-rotator button, 2) move stick to the fully back and centered position, 3) release the wheel brake and 4) advance the throttle to takeoff power. (Starting here, we rely on manifold pressure as the chief measure of engine output.)
Now it is time to pilot the aircraft! For a safe takeoff, we need to achieve two things: 1) a minimum of 220 rotor RPMs and 2) adequate airspeed to climb out. With the stick fully back, the rotor is tilted back and our take-off roll is forcing the greatest possible amount of air through the rotor. This increases the speed of the rotor at the same time that our forward speed increases. You can just make out the indicator needle on the rotor RPM gauge: it quickly passes the 220 minimum and by 0:49 or so, it passes 300. This is about when the nose starts to come off the ground. Ideally, we want to hold that nose wheel just off the ground and continue the runway roll as forward speed builds. (This is done by easing the stick forward just a bit.) I manage to maintain that attitude for about five seconds (which isn’t bad, I think!). At a speed of about 40 knots, the plane becomes airborne (0:56). At this point, we would still like to build more airspeed before we climb (see note on safe airspeed at the end of this description), so I push the throttle to full power to ensure that we won’t descend again and hold it close to the runway for a few more seconds. By 1:05, we reach 50 knots and we start to climb. Once airspeed climbs a bit more, I’ll pull the nose up a bit to achieve the “best climb” speed of ~55 kts and I’ll tweak the trim button on the back of the stick to help hold that attitude. You’ll see that that the variometer has jumped up to show a climb rate of 500 fpm and of course the ground falls away quickly. I am flying a gyroplane!
From here, we climb steadily. At 1:49 we past 500 feet of elevation and I pull back the throttle a bit to moderate the load on the engine but still keep us climbing. We will then turn left into the pattern. About 2:35 as I make another left hand turn onto the downwind leg of the pattern, you’ll notice the CFI grabbing the stick with his thumb and forefinger. He is doing this to activate the radio talk button and say something to the traffic in the area. (He laughs a few times a minute or two later—there was some joking going on amongst the pilots with each saying “Petaluma” in a silly way at the end of their traffic announcement. He also sometimes answers radio checks, questions from approaching pilots who are still out of sight of the airport, etc.) Shortly after that turn at ~2:54, we are approaching the pattern altitude of 1000 feet, so I pull back on the throttle to stop climbing and adjust rotor attitude to keep us flying at 55 to 60 kts.
Then at about 3:33, I pull back the throttle to begin our descent and soon start a left turn on to the base leg of the pattern. We turn base at about 700 feet altitude and final at about 500 feet of altitude. On most approaches, I’m about 100 feet higher at each of those points, but those altitudes are just fine.
Once we are on final, I point the nose of the aircraft at the end of the runway and try to keep the end stripes in a fixed location in my windshield. I use stick to maintain airspeed in the 55 to 60 kts range and throttle to control our rate of descent. As we get to less than ten feet above the runway, I ease the stick back to raise the nose and slow our descent. This has the effect of also increasing the overall drag of the rotor, slowing us and causing us to descend further. At this point, I am trying to achieve a smooth descent that slows to nearly nothing as we touch down. (You’ll see the CFI place his hand near the stick at the final part there, just in case he needs to take any corrective action but, fortunately, he does not need to!)
I find that the stick movement immediately after touchdown is the single most counterintuitive thing there is about flying a gyro. In every aircraft I’m familiar with, if you want the nose to go down, you move the stick forward. Commonly, that’s what you do after landing. Or maybe you hold steady with the nose still off the ground for a few seconds to bleed off some speed and then when it drops, you push the stick forward. Not so with the gyro. When you move the stick forward after landing in a gyro it tilts the rotor forward which causes the plane to speed up and increases the lift being applied. Speeding down the runway and hopping back into the air are not what we want at this point. Furthermore, the stick forward move puts all the weight on that single front wheel which can react unpredictably and might cause the airplane to tip dangerously to either side. (I’ve been told that runway/taxiway incidents account for the vast majority of gyroplane accidents.)
The RIGHT thing to do after landing, is to pull the stick to the rear-most position (pausing to let the nose settle if it comes off the ground along the way as happens in this case). Wtih that rear position the rotor is tilted all the way back, contributing maximum drag and minimum lift. As a result, speed bleeds off and the gyro quickly slows.
This fully-back stick position is only held for a few seconds: just long enough to slow the gyro. It is important that as soon as the speed reaches that of a walk, the stick be pushed forward again—if not the rotor forces will actually start to pull the plane backwards. In this case I got distracted with turning onto the taxiway and didn’t get the stick forward fast enough to satisfy my instructor so he gives a helpful push on the stick to remind me.
Once we are clear of the active runway, I stop the plane using the wheel brake (and set it so it won’t release). Then I activate the rotor brake and switch off pump 2 and lights to reduce electrical load. I forget to bump the engine speed up a bit to try to keep the “low voltage” light from coming on. Once it comes on, the CFI bumps the throttle up a bit. Once I flip the rotor brake on, I use my right thumb on the “trim” button to pump up the rotor brake. You’ll see the pressure for the brake rise in the gauge to the right of the rotor brake and the two magneto switches. (5:56 to 6:06) After this the rotor begins to slow and eventually stop.
Ideally, we want the rotor aligned straight overhead running from front to back. If it is significantly off that line, we have a couple of ways to bring it in line, but in this case, it stopped close enough to that position that we were content to leave it be as we taxi back to the start of the runway for another circuit. (You’ll see the alignment from the rotor shadow as I make the turn onto the taxiway.)
That’s pretty much it for one trip around the pattern.
Note on Safe Airspeed

The Autogyro USA Cavalon Pilot Operating Handbook includes a “power curve” indicating safe operating airspeeds at various altitudes. Here’s what (most of it) looks like, at left.
Generally, this says that a speed of 55 kts or more is good at all elevations and that above 500 feet (where the full curve meets the 0 kts vertical axis) all speeds are allowable. But during takeoff, we are at slow speeds and very low elevation. You’ll see that the curve visibly departs from the 0 altitude horizontal as low as 22 kts.
Thus normal operation anticipates becoming airborne before the airspeed needed for climbing is achieved. However the curve also limits operations to very low elevations—just 5 to 10 feet off the ground—until adequate speed has been achieved for a safe climb out. The minimum speed for climb out is 45 kts with a recommended speed of 55 kts. Thus when we first become airborne, we fly just above the runway as we continue to build speed. Only once we have reached adequate speed is it safe to climb away from the runway. Of course, this usually happens very quickly as seen in this video. However, as the Pilot Handbook notes:
“[O]peration ‘behind the power curve’ may have fatal consequences during take-off, initial climb or in any other situation with in ground proximity.”
And now, finally, the video: