
I’ve been doing some welding again in the past year and have recently produced a couple of things that I’m really happy with. This one was pretty simple really, but it involved tackling some new challenges.
First trick was how to best weld bicycle (or, in this case, motorcycle) chain. You can find lots of examples of things made this way, but I never ran across any directions for doing the welding. After looking closely at some of the examples I could find online and chatting with my welding instructor, I decided to work inside the links so that the outside would still look like unmodified chain. Working with a MIG welder, it took some time to get both some experience (I’d not really done much MIG before) and the right settings.
One big issue was that all of the chain you can buy through retail channels comes already lubed. Even after some heavy treatment with degreaser, some thorough scrubbing and many rag wipes, there was still a good bit of residual grease. During welding this grease vaporizes or burns and that’s not stuff I think anyone should be breathing, so that was another issue to contend with. Only after I was done with the welding did I wind up sandblasting all the chain–which did a great job of taking off all the grease. If I do another project with chain, I will do the sandblasting BEFORE starting the welding.
The overall structure of this piece consists of a 3/4-inch piece of plywood wrapped on 5 sides with 18-gauge steel. The four bolts you see in the corners plus the screws that attach the chain hooks keep the wood and steel layers together. I hung it on the wall using a French cleat (often used for mirrors) attached to the plywood base.
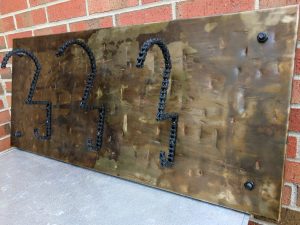
The second big area of exploration and discovery with this project was decoration of the finished pieces. I had a little prior experience using a patina to color and finish metals, but this was going to be a big project with a lot of visible surface so I didn’t want to mess it up. Thus I did a lot of experimentation–which I think paid off. I started with a look I was interested in achieving and I had a formula for how that look was supposed to be achieved, but in my trials, I could never achieve the finished look that was hoping for. The formula started with light application of a black patina followed by application of a Cupric Nitrate solution to the hot steel. For awhile I was convinced that my poor results were happening because I didn’t yet have a good feel for getting the metal to the right temperature. Ultimately however, I changed to a completely different black patina for the first step and that made all the difference.
In the pictures, the resulting finish on the base panel looks a lot like a “camo” finish, but that is certainly unintentional. Before I started with the patinas, I first abused the surface with a slightly modified machinists hammer to give it some texture. Then I applied both the base patina and the cupric nitrate solution rather randomly, at times simply dumping containers onto the surface and letting the solution go where it would. This, plus variations in the heating of the metal before treatment, led to a lot of variety in the colors and tones achieved in the finish. After those two steps, I considered doing more but stepping back to look at it, I decided that it looked pretty good and that I’d better leave well enough alone. To finish it all off, I sprayed it with a matte clear coat to hold the color and protect the colors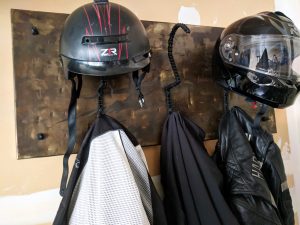 from degradation.
For the chain hooks, I wasn’t happy with how the application of black patina was working out so I opted to just spray paint them in matte black. Ditto for the mounting screws and the four corner bolts.
So this item is now in use in my garage where it may be the nicest looking thing in the garage other than the bikes it is intended to support.
RD